Elasticsearch integration (STARTER ONLY)
Introduced in GitLab Starter 8.4. Support for Amazon Elasticsearch was introduced in GitLab Starter 9.0.
This document describes how to set up Elasticsearch with GitLab. Once enabled, you'll have the benefit of fast search response times and the advantage of two special searches:
Version Requirements
| GitLab version | Elasticsearch version |
|---|---|
| GitLab Enterprise Edition 8.4 - 8.17 | Elasticsearch 2.4 with Delete By Query Plugin installed |
| GitLab Enterprise Edition 9.0 - 11.4 | Elasticsearch 5.1 - 5.5 |
| GitLab Enterprise Edition 11.5+ | Elasticsearch 5.6 - 6.x |
Installing Elasticsearch
Elasticsearch is not included in the Omnibus packages. You will have to install it yourself whether you are using the Omnibus package or installed GitLab from source. Providing detailed information on installing Elasticsearch is out of the scope of this document.
NOTE: Note: Elasticsearch should be installed on a separate server, whether you install it yourself or by using the Amazon Elasticsearch service. Running Elasticsearch on the same server as GitLab is not recommended and it will likely cause performance degradation on the GitLab installation.
Once the data is added to the database or repository and Elasticsearch is enabled in the admin area the search index will be updated automatically.
Elasticsearch repository indexer (beta)
In order to improve elasticsearch indexing performance, GitLab has made available a new indexer written in Go. This will replace the included Ruby indexer in the future but should be considered beta software for now, so there may be some bugs.
The Elasticsearch Go indexer is included in Omnibus for GitLab 11.8 and newer.
To use the new Elasticsearch indexer included in Omnibus, check the box "Use the new repository indexer (beta)" when enabling the Elasticsearch integration.
If you would like to use the Elasticsearch Go indexer with a source installation or an older version of GitLab, please follow the instructions below.
Installation
First, we need to install some dependencies, then we'll build and install the indexer itself.
Dependencies
This project relies on ICU for text encoding,
therefore we need to ensure the development packages for your platform are
installed before running make.
Debian / Ubuntu
To install on Debian or Ubuntu, run:
sudo apt install libicu-devCentOS / RHEL
To install on CentOS or RHEL, run:
sudo yum install libicu-develMac OSX
To install on macOS, run:
brew install icu4c
export PKG_CONFIG_PATH="/usr/local/opt/icu4c/lib/pkgconfig:$PKG_CONFIG_PATH"
Building and installing
To build and install the indexer, run:
git clone https://gitlab.com/gitlab-org/gitlab-elasticsearch-indexer.git
cd gitlab-elasticsearch-indexer
make
sudo make install
The gitlab-elasticsearch-indexer will be installed to /usr/local/bin.
You can change the installation path with the PREFIX env variable.
Please remember to pass the -E flag to sudo if you do so.
Example:
PREFIX=/usr sudo -E make installOnce installed, enable it under your instance's elasticsearch settings explained below.
System Requirements
Elasticsearch requires additional resources in excess of those documented in the GitLab system requirements. These will vary by installation size, but you should ensure at least an additional 8 GiB of RAM for each Elasticsearch node, per the official guidelines.
Keep in mind, this is the minimum requirements as per Elasticsearch. For production instances, they recommend considerably more resources.
Storage requirements also vary based on the installation side, but as a rule of thumb, you should allocate the total size of your production database, plus two-thirds of the total size of your git repositories. Efforts to reduce this total are being tracked in this epic: gitlab-org&153.
Enabling Elasticsearch
In order to enable Elasticsearch, you need to have admin access. Go to Admin > Settings > Integrations and find the "Elasticsearch" section.
The following Elasticsearch settings are available:
| Parameter | Description |
|---|---|
Elasticsearch indexing |
Enables/disables Elasticsearch indexing. You may want to enable indexing but disable search in order to give the index time to be fully completed, for example. Also, keep in mind that this option doesn't have any impact on existing data, this only enables/disables background indexer which tracks data changes. So by enabling this you will not get your existing data indexed, use special rake task for that as explained in Adding GitLab's data to the Elasticsearch index. |
Use the new repository indexer (beta) |
Perform repository indexing using GitLab Elasticsearch Indexer. |
Search with Elasticsearch enabled |
Enables/disables using Elasticsearch in search. |
URL |
The URL to use for connecting to Elasticsearch. Use a comma-separated list to support clustering (e.g., http://host1, https://host2:9200). If your Elasticsearch instance is password protected, pass the username:password in the URL (e.g., http://<username>:<password>@<elastic_host>:9200/). |
Number of Elasticsearch shards |
Elasticsearch indexes are split into multiple shards for performance reasons. In general, larger indexes need to have more shards. Changes to this value do not take effect until the index is recreated. You can read more about tradeoffs in the Elasticsearch documentation |
Number of Elasticsearch replicas |
Each Elasticsearch shard can have a number of replicas. These are a complete copy of the shard, and can provide increased query performance or resilience against hardware failure. Increasing this value will greatly increase total disk space required by the index. |
Limit namespaces and projects that can be indexed |
Enabling this will allow you to select namespaces and projects to index. All other namespaces and projects will use database search instead. Please note that if you enable this option but do not select any namespaces or projects, none will be indexed. Read more below. |
Using AWS hosted Elasticsearch with IAM credentials |
Sign your Elasticsearch requests using AWS IAM authorization or AWS EC2 Instance Profile Credentials. The policies must be configured to allow es:* actions. |
AWS Region |
The AWS region your Elasticsearch service is located in. |
AWS Access Key |
The AWS access key. |
AWS Secret Access Key |
The AWS secret access key. |
Limiting namespaces and projects
If you select Limit namespaces and projects that can be indexed, more options will become available
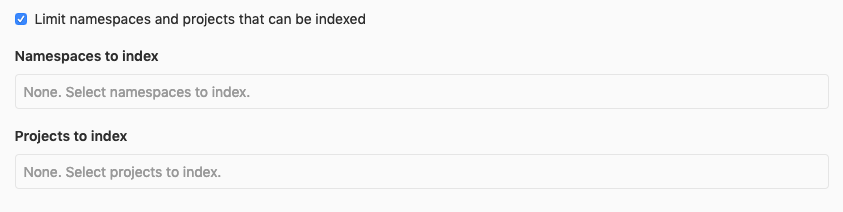
You can select namespaces and projects to index exclusively. Please note that if the namespace is a group it will include any sub-groups and projects belonging to those sub-groups to be indexed as well.
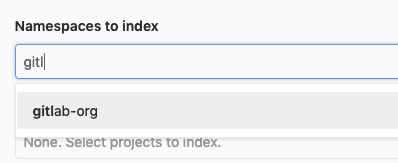
You can filter the selection dropdown by writing part of the namespace or project name you're interested in.
NOTE: Note: If no namespaces or projects are selected, no Elasticsearch indexing will take place.
CAUTION: Warning:
If you have already indexed your instance, you will have to regenerate the index in order to delete all existing data
for filtering to work correctly. To do this run the rake tasks gitlab:elastic:create_empty_index and
gitlab:elastic:clear_index_status. Afterwards, removing a namespace or a project from the list will delete the data
from the Elasticsearch index as expected.
Disabling Elasticsearch
To disable the Elasticsearch integration:
- Navigate to the Admin > Settings > Integrations
- Find the 'Elasticsearch' section and uncheck 'Search with Elasticsearch enabled' and 'Elasticsearch indexing'
- Click Save for the changes to take effect
- (Optional) Delete the existing index by running the command
sudo gitlab-rake gitlab:elastic:delete_index
Adding GitLab's data to the Elasticsearch index
Indexing small instances (database size less than 500 MiB, size of repos less than 5 GiB)
Configure Elasticsearch's host and port in Admin > Settings. Then index the data using one of the following commands:
# Omnibus installations
sudo gitlab-rake gitlab:elastic:index

# Installations from source
bundle exec rake gitlab:elastic:index RAILS_ENV=production
After it completes the indexing process, enable Elasticsearch searching.
Indexing large instances
WARNING: Warning: Performing asynchronous indexing, as this will describe, will generate a lot of sidekiq jobs. Make sure to prepare for this task by either Horizontally Scaling or creating extra sidekiq processes
Configure Elasticsearch's host and port in Admin > Settings > Integrations. Then create empty indexes using one of the following commands:
# Omnibus installations
sudo gitlab-rake gitlab:elastic:create_empty_index

# Installations from source
bundle exec rake gitlab:elastic:create_empty_index RAILS_ENV=production
Indexing large Git repositories can take a while. To speed up the process, you can temporarily disable auto-refreshing and replicating. In our experience, you can expect a 20% decrease in indexing time. We'll enable them when indexing is done. This step is optional!
curl --request PUT localhost:9200/gitlab-production/_settings --data '{
    "index" : {
        "refresh_interval" : "-1",
        "number_of_replicas" : 0
    } }'
Then enable Elasticsearch indexing and run project indexing tasks:
# Omnibus installations
sudo gitlab-rake gitlab:elastic:index_projects

# Installations from source
bundle exec rake gitlab:elastic:index_projects RAILS_ENV=production
This enqueues a Sidekiq job for each project that needs to be indexed.
You can view the jobs in the admin panel (they are placed in the elastic_indexer
queue), or you can query indexing status using a rake task:
# Omnibus installations
sudo gitlab-rake gitlab:elastic:index_projects_status

# Installations from source
bundle exec rake gitlab:elastic:index_projects_status RAILS_ENV=production

Indexing is 65.55% complete (6555/10000 projects)
If you want to limit the index to a range of projects you can provide the
ID_FROM and ID_TO parameters:
# Omnibus installations
sudo gitlab-rake gitlab:elastic:index_projects ID_FROM=1001 ID_TO=2000

# Installations from source
bundle exec rake gitlab:elastic:index_projects ID_FROM=1001 ID_TO=2000 RAILS_ENV=production
Where ID_FROM and ID_TO are project IDs. Both parameters are optional.
The above examples will index all projects starting with ID 1001 up to (and including) ID 2000.
TIP: Troubleshooting:
Sometimes the project indexing jobs queued by gitlab:elastic:index_projects
can get interrupted. This may happen for many reasons, but it's always safe
to run the indexing task again - it will skip those repositories that have
already been indexed.
As the indexer stores the last commit SHA of every indexed repository in the
database, you can run the indexer with the special parameter UPDATE_INDEX and
it will check every project repository again to make sure that every commit in
that repository is indexed, it can be useful in case if your index is outdated:
# Omnibus installations
sudo gitlab-rake gitlab:elastic:index_projects UPDATE_INDEX=true ID_TO=1000

# Installations from source
bundle exec rake gitlab:elastic:index_projects UPDATE_INDEX=true ID_TO=1000 RAILS_ENV=production
You can also use the gitlab:elastic:clear_index_status Rake task to force the
indexer to "forget" all progress, so retrying the indexing process from the
start.
The index_projects command enqueues jobs to index all project and wiki
repositories, and most database content. However, snippets still need to be
indexed separately. To do so, run one of these commands:
# Omnibus installations
sudo gitlab-rake gitlab:elastic:index_snippets

# Installations from source
bundle exec rake gitlab:elastic:index_snippets RAILS_ENV=production
Enable replication and refreshing again after indexing (only if you previously disabled it):
curl --request PUT localhost:9200/gitlab-production/_settings --data '{
    "index" : {
        "number_of_replicas" : 1,
        "refresh_interval" : "1s"
    } }'
A force merge should be called after enabling the refreshing above.
For Elasticsearch 6.x, before proceeding with the force merge, the index should be in read-only mode:
curl --request PUT localhost:9200/gitlab-production/_settings --data '{
  "settings": {
    "index.blocks.write": true
  } }'
Then, initiate the force merge:
curl --request POST 'http://localhost:9200/gitlab-production/_forcemerge?max_num_segments=5'After this, if your index is in read-only, switch back to read-write:
curl --request PUT localhost:9200/gitlab-production/_settings --data '{
  "settings": {
    "index.blocks.write": false
  } }'
Enable Elasticsearch search in Admin > Settings > Integrations. That's it. Enjoy it!
Index limit
Currently for repository and snippet files, GitLab would only index up to 1 MB of content, in order to avoid indexing timeout.
GitLab Elasticsearch Rake Tasks
There are several rake tasks available to you via the command line:
-
sudo gitlab-rake gitlab:elastic:index
- This is a wrapper task. It does the following:
sudo gitlab-rake gitlab:elastic:create_empty_indexsudo gitlab-rake gitlab:elastic:clear_index_statussudo gitlab-rake gitlab:elastic:index_projectssudo gitlab-rake gitlab:elastic:index_snippets
- This is a wrapper task. It does the following:
-
sudo gitlab-rake gitlab:elastic:index_projects
- This iterates over all projects and queues sidekiq jobs to index them in the background.
-
sudo gitlab-rake gitlab:elastic:index_projects_status
- This determines the overall status of the indexing. It is done by counting the total number of indexed projects, dividing by a count of the total number of projects, then multiplying by 100.
-
sudo gitlab-rake gitlab:elastic:create_empty_index
- This generates an empty index on the Elasticsearch side.
-
sudo gitlab-rake gitlab:elastic:clear_index_status
- This deletes all instances of IndexStatus for all projects.
-
sudo gitlab-rake gitlab:elastic:delete_index
- This removes the GitLab index on the Elasticsearch instance.
-
sudo gitlab-rake gitlab:elastic:recreate_index
- Does the same thing as
sudo gitlab-rake gitlab:elastic:create_empty_index
- Does the same thing as
-
sudo gitlab-rake gitlab:elastic:index_snippets
- Performs an Elasticsearch import that indexes the snippets data.
-
sudo gitlab-rake gitlab:elastic:projects_not_indexed
- Displays which projects are not indexed.
Environment Variables
In addition to the rake tasks, there are some environment variables that can be used to modify the process:
| Environment Variable | Data Type | What it does |
|---|---|---|
UPDATE_INDEX |
Boolean | Tells the indexer to overwrite any existing index data (true/false). |
ID_TO |
Integer | Tells the indexer to only index projects less than or equal to the value. |
ID_FROM |
Integer | Tells the indexer to only index projects greater than or equal to the value. |
Indexing a specific project
Because the ID_TO and ID_FROM environment variables use the or equal to comparison, you can index only one project by using both these variables with the same project ID number:
root@git:~# sudo gitlab-rake gitlab:elastic:index_projects ID_TO=5 ID_FROM=5
Indexing project repositories...I, [2019-03-04T21:27:03.083410 #3384]  INFO -- : Indexing GitLab User / test (ID=33)...
I, [2019-03-04T21:27:05.215266 #3384]  INFO -- : Indexing GitLab User / test (ID=33) is done!
Elasticsearch Index Scopes
When performing a search, the GitLab index will use the following scopes:
| Scope Name | What it searches |
|---|---|
commits |
Commit data |
projects |
Project data (default) |
blobs |
Code |
issues |
Issue data |
merge_requests |
Merge Request data |
milestones |
Milestone data |
notes |
Note data |
snippets |
Snippet data |
wiki_blobs |
Wiki contents |
Tuning
Deleted documents
Whenever a change or deletion is made to an indexed GitLab object (a merge request description is changed, a file is deleted from the master branch in a repository, a project is deleted, etc), a document in the index is deleted. However, since these are "soft" deletes, the overall number of "deleted documents", and therefore wasted space, increases. Elasticsearch does intelligent merging of segments in order to remove these deleted documents. However, depending on the amount and type of activity in your GitLab installation, it's possible to see as much as 50% wasted space in the index.
In general, we recommend simply letting Elasticsearch merge and reclaim space automatically, with the default settings. From Lucene's Handling of Deleted Documents, "Overall, besides perhaps decreasing the maximum segment size, it is best to leave Lucene's defaults as-is and not fret too much about when deletes are reclaimed."
However, some larger installations may wish to tune the merge policy settings:
-
Consider reducing the
index.merge.policy.max_merged_segmentsize from the default 5 GB to maybe 2 GB or 3 GB. Merging only happens when a segment has at least 50% deletions. Smaller segment sizes will allow merging to happen more frequently.curl --request PUT http://localhost:9200/gitlab-production/_settings --data '{ "index" : { "merge.policy.max_merged_segment": "2gb" } }' -
You can also adjust
index.merge.policy.reclaim_deletes_weight, which controls how aggressively deletions are targeted. But this can lead to costly merge decisions, so we recommend not changing this unless you understand the tradeoffs.curl --request PUT http://localhost:9200/gitlab-production/_settings --data '{ "index" : { "merge.policy.reclaim_deletes_weight": "3.0" } }' -
Do not do a force merge to remove deleted documents. A warning in the documentation states that this can lead to very large segments that may never get reclaimed, and can also cause significant performance or availability issues.
Troubleshooting
Here are some common pitfalls and how to overcome them:
-
How can I verify my GitLab instance is using Elasticsearch?
The easiest method is via the rails console (
sudo gitlab-rails console) by running the following:u = User.find_by_username('your-username') s = SearchService.new(u, {:search => 'search_term'}) pp s.search_objects.class.nameIf you see
Elasticsearch::Model::Response::Records, you are using Elasticsearch. -
I updated GitLab and now I can't find anything
We continuously make updates to our indexing strategies and aim to support newer versions of Elasticsearch. When indexing changes are made, it may be necessary for you to reindex after updating GitLab.
-
I indexed all the repositories but I can't find anything
Make sure you indexed all the database data as stated above.
Beyond that, check via the Elasticsearch Search API to see if the data shows up on the Elasticsearch side.
If it shows up via the Elasticsearch Search API, check that it shows up via the rails console (
sudo gitlab-rails console):u = User.find_by_username('your-username') s = SearchService.new(u, {:search => 'search_term', :scope => ‘blobs’}) pp s.search_objects.to_aSee Elasticsearch Index Scopes for more information on searching for specific types of data.
-
I indexed all the repositories but then switched Elasticsearch servers and now I can't find anything
You will need to re-run all the rake tasks to re-index the database, repositories, and wikis.
-
The indexing process is taking a very long time
The more data present in your GitLab instance, the longer the indexing process takes.
-
There are some projects that weren't indexed, but we don't know which ones
You can run
sudo gitlab-rake gitlab:elastic:projects_not_indexedto display projects that aren't indexed. -
No new data is added to the Elasticsearch index when I push code
When performing the initial indexing of blobs, we lock all projects until the project finishes indexing. It could happen that an error during the process causes one or multiple projects to remain locked. In order to unlock them, run the
gitlab:elastic:clear_locked_projectsrake task. -
"Can't specify parent if no parent field has been configured"
If you enabled Elasticsearch before GitLab 8.12 and have not rebuilt indexes you will get exception in lots of different cases:
Elasticsearch::Transport::Transport::Errors::BadRequest([400] {
    "error": {
        "root_cause": [{
            "type": "illegal_argument_exception",
            "reason": "Can't specify parent if no parent field has been configured"
        }],
        "type": "illegal_argument_exception",
        "reason": "Can't specify parent if no parent field has been configured"
    },
    "status": 400
}):
This is because we changed the index mapping in GitLab 8.12 and the old indexes should be removed and built from scratch again, see details in the 8-11-to-8-12 update guide.
-
Exception
Elasticsearch::Transport::Transport::Errors::BadRequestIf you have this exception (just like in the case above but the actual message is different) please check if you have the correct Elasticsearch version and you met the other requirements. There is also an easy way to check it automatically with
sudo gitlab-rake gitlab:checkcommand. -
Exception
Elasticsearch::Transport::Transport::Errors::RequestEntityTooLarge[413] {"Message":"Request size exceeded 10485760 bytes"}This exception is seen when your Elasticsearch cluster is configured to reject requests above a certain size (10MiB in this case). This corresponds to the
http.max_content_lengthsetting inelasticsearch.yml. Increase it to a larger size and restart your Elasticsearch cluster.AWS has fixed limits for this setting ("Maximum Size of HTTP Request Payloads"), based on the size of the underlying instance.