GitLab Container Registry
- Introduced in GitLab 8.8.
- Docker Registry manifest
v1support was added in GitLab 8.9 to support Docker versions earlier than 1.10.- Starting from GitLab 8.12, if you have 2FA enabled in your account, you need to pass a personal access token instead of your password in order to login to GitLab's Container Registry.
- Multiple level image names support was added in GitLab 9.1.
With the Docker Container Registry integrated into GitLab, every project can have its own space to store its Docker images.
This document is the user guide. To learn how to enable GitLab Container Registry across your GitLab instance, visit the administrator documentation.
You can read more about Docker Registry at https://docs.docker.com/registry/introduction/.
Enable the Container Registry for your project
If you cannot find the Packages > Container Registry entry under your project's sidebar, it is not enabled in your GitLab instance. Ask your administrator to enable GitLab Container Registry following the administration documentation.
If you are using GitLab.com, this is enabled by default so you can start using the Registry immediately. Currently there is a soft (10GB) size restriction for registry on GitLab.com, as part of the repository size limit.
Once enabled for your GitLab instance, to enable Container Registry for your project:
- Go to your project's Settings > General page.
- Expand the Visibility, project features, permissions section and enable the Container Registry feature on your project. For new projects this might be enabled by default. For existing projects (prior GitLab 8.8), you will have to explicitly enable it.
- Press Save changes for the changes to take effect. You should now be able to see the Packages > Container Registry link in the sidebar.
Build and push images
Notes:
- Moving or renaming existing container registry repositories is not supported once you have pushed images because the images are signed, and the signature includes the repository name.
- To move or rename a repository with a container registry you will have to delete all existing images.
If you visit the Packages > Container Registry link under your project's menu, you can see the explicit instructions to login to the Container Registry using your GitLab credentials.
For example if the Registry's URL is registry.example.com, then you should be
able to login with:
docker login registry.example.comBuilding and publishing images should be a straightforward process. Just make sure that you are using the Registry URL with the namespace and project name that is hosted on GitLab:
docker build -t registry.example.com/group/project/image .
docker push registry.example.com/group/project/image
Your image will be named after the following scheme:
<registry URL>/<namespace>/<project>/<image>GitLab supports up to three levels of image repository names.
Following examples of image tags are valid:
registry.example.com/group/project:some-tag
registry.example.com/group/project/image:latest
registry.example.com/group/project/my/image:rc1
Use images from GitLab Container Registry
To download and run a container from images hosted in GitLab Container Registry,
use docker run:
docker run [options] registry.example.com/group/project/image [arguments]For more information on running Docker containers, visit the Docker documentation.
Control Container Registry from within GitLab
GitLab offers a simple Container Registry management panel. Go to your project and click Packages > Container Registry in the project menu.
This view will show you all tags in your project and will easily allow you to delete them.
Build and push images using GitLab CI
Note: This feature requires GitLab 8.8 and GitLab Runner 1.2.
Make sure that your GitLab Runner is configured to allow building Docker images by following the Using Docker Build and Using the GitLab Container Registry documentation. Alternatively, you can build images with Kaniko if the Docker builds are not an option for you.
Using with private projects
Personal Access tokens were introduced in GitLab 9.3. Project Deploy Tokens were introduced in GitLab 10.7
If a project is private, credentials will need to be provided for authorization. There are two ways to do this:
- By using a personal access token.
- By using a deploy token.
The minimal scope needed for both of them is read_registry.
Example of using a token:
docker login registry.example.com -u <username> -p <token>Troubleshooting the GitLab Container Registry
Basic Troubleshooting
-
Check to make sure that the system clock on your Docker client and GitLab server have been synchronized (e.g. via NTP).
-
If you are using an S3-backed Registry, double check that the IAM permissions and the S3 credentials (including region) are correct. See the sample IAM policy for more details.
-
Check the Registry logs (e.g.
/var/log/gitlab/registry/current) and the GitLab production logs for errors (e.g./var/log/gitlab/gitlab-rails/production.log). You may be able to find clues there.
Enable the registry debug server
The optional debug server can be enabled by setting the registry debug address
in your gitlab.rb configuration.
registry['debug_addr'] = "localhost:5001"After adding the setting, reconfigure GitLab to apply the change.
Use curl to request debug output from the debug server:
curl localhost:5001/debug/health
curl localhost:5001/debug/vars
Docker connection error
A Docker connection error can occur when there are special characters in either the group, project or branch name. Special characters can include:
- Leading underscore
- Trailing hyphen/dash
- Double hyphen/dash
To get around this, you can change the group path, change the project path or chanage the branch name.
Advanced Troubleshooting
NOTE: Note: The following section is only recommended for experts.
Sometimes it's not obvious what is wrong, and you may need to dive deeper into the communication between the Docker client and the Registry to find out what's wrong. We will use a concrete example in the past to illustrate how to diagnose a problem with the S3 setup.
Unexpected 403 error during push
A user attempted to enable an S3-backed Registry. The docker login step went
fine. However, when pushing an image, the output showed:
The push refers to a repository [s3-testing.myregistry.com:4567/root/docker-test/docker-image]
dc5e59c14160: Pushing [==================================================>] 14.85 kB
03c20c1a019a: Pushing [==================================================>] 2.048 kB
a08f14ef632e: Pushing [==================================================>] 2.048 kB
228950524c88: Pushing 2.048 kB
6a8ecde4cc03: Pushing [==>                                                ] 9.901 MB/205.7 MB
5f70bf18a086: Pushing 1.024 kB
737f40e80b7f: Waiting
82b57dbc5385: Waiting
19429b698a22: Waiting
9436069b92a3: Waiting
error parsing HTTP 403 response body: unexpected end of JSON input: ""
This error is ambiguous, as it's not clear whether the 403 is coming from the GitLab Rails application, the Docker Registry, or something else. In this case, since we know that since the login succeeded, we probably need to look at the communication between the client and the Registry.
The REST API between the Docker client and Registry is described here. Normally, one would just use Wireshark or tcpdump to capture the traffic and see where things went wrong. However, since all communications between Docker clients and servers are done over HTTPS, it's a bit difficult to decrypt the traffic quickly even if you know the private key. What can we do instead?
One way would be to disable HTTPS by setting up an insecure Registry. This could introduce a security hole and is only recommended for local testing. If you have a production system and can't or don't want to do this, there is another way: use mitmproxy, which stands for Man-in-the-Middle Proxy.
mitmproxy
mitmproxy allows you to place a proxy between your client and server to inspect all traffic. One wrinkle is that your system needs to trust the mitmproxy SSL certificates for this to work.
The following installation instructions assume you are running Ubuntu:
-
Run
mitmproxy --port 9000to generate its certificates. Enter CTRL-C to quit. -
Install the certificate from
~/.mitmproxyto your system:sudo cp ~/.mitmproxy/mitmproxy-ca-cert.pem /usr/local/share/ca-certificates/mitmproxy-ca-cert.crt sudo update-ca-certificates
If successful, the output should indicate that a certificate was added:
Updating certificates in /etc/ssl/certs... 1 added, 0 removed; done.
Running hooks in /etc/ca-certificates/update.d....done.
To verify that the certificates are properly installed, run:
mitmproxy --port 9000This will run mitmproxy on port 9000. In another window, run:
curl --proxy http://localhost:9000 https://httpbin.org/status/200If everything is set up correctly, you will see information on the mitmproxy window and no errors from the curl commands.
Running the Docker daemon with a proxy
For Docker to connect through a proxy, you must start the Docker daemon with the
proper environment variables. The easiest way is to shutdown Docker (e.g. sudo initctl stop docker)
and then run Docker by hand. As root, run:
export HTTP_PROXY="http://localhost:9000"
export HTTPS_PROXY="https://localhost:9000"
docker daemon --debug
This will launch the Docker daemon and proxy all connections through mitmproxy.
Running the Docker client
Now that we have mitmproxy and Docker running, we can attempt to login and push a container image. You may need to run as root to do this. For example:
docker login s3-testing.myregistry.com:4567
docker push s3-testing.myregistry.com:4567/root/docker-test/docker-image
In the example above, we see the following trace on the mitmproxy window:
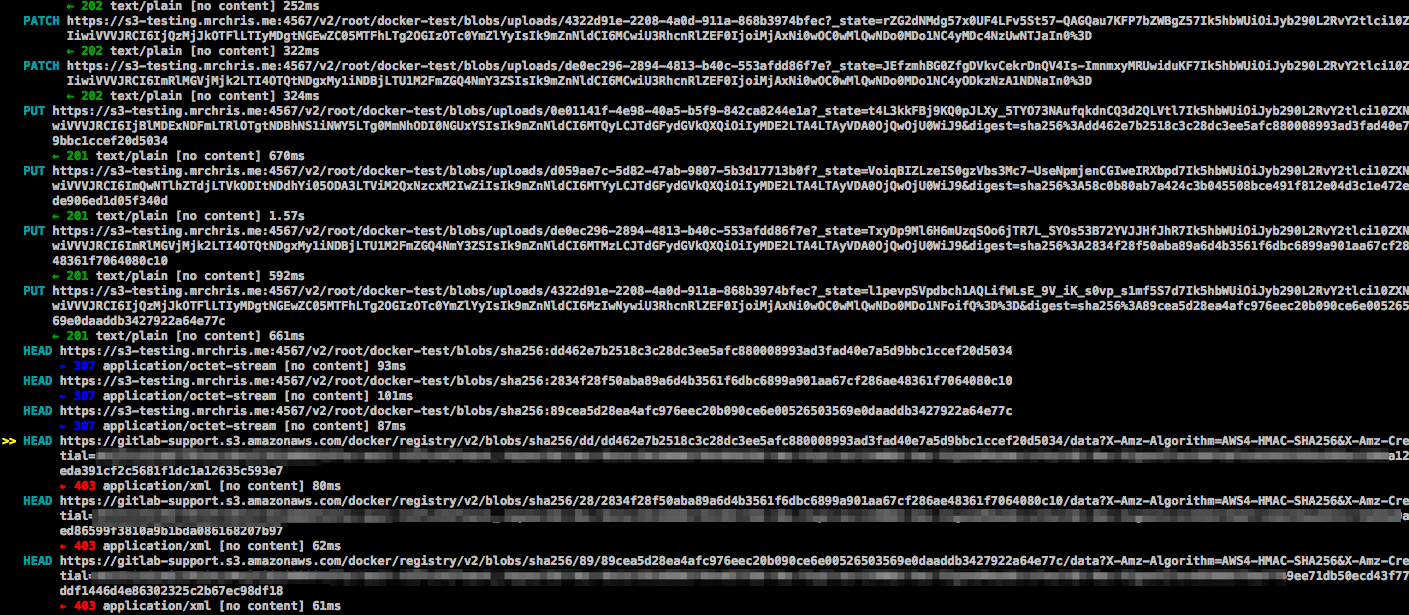
The above image shows:
- The initial PUT requests went through fine with a 201 status code.
- The 201 redirected the client to the S3 bucket.
- The HEAD request to the AWS bucket reported a 403 Unauthorized.
What does this mean? This strongly suggests that the S3 user does not have the right permissions to perform a HEAD request. The solution: check the IAM permissions again. Once the right permissions were set, the error will go away.