SAML SSO for GitLab.com Groups (SILVER ONLY)
Introduced in GitLab.com Silver 11.0.
NOTE: Note: This topic is for SAML on GitLab.com Silver tier and above. For SAML on self-managed GitLab instances, see SAML OmniAuth Provider.
SAML on GitLab.com allows users to be automatically added to a group, and then allows those users to sign into GitLab.com. Users should already have an account on the GitLab instance, or can create one when logging in for the first time.
User synchronization for GitLab.com is partially supported using SCIM.
NOTE: Note: SAML SSO for GitLab.com groups does not sync users between providers without using SCIM. If a group is not using SCIM, group Owners will still need to manage user accounts (for example, removing users when necessary).
Configuring your Identity Provider
- Navigate to the group and click Settings > SAML SSO.
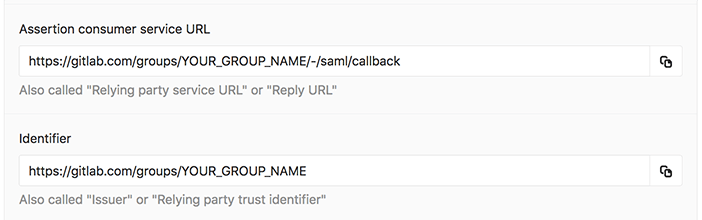
- Configure your SAML server using the Assertion consumer service URL and Identifier. Alternatively GitLab provides metadata XML configuration. See your identity provider's documentation for more details.
- Configure the SAML response to include a NameID that uniquely identifies each user.
- Configure required assertions using the table below.
- Once the identity provider is set up, move on to configuring GitLab.
SSO enforcement
SSO enforcement was:
With this option enabled, users must use your group's GitLab single sign on URL to be added to the group or be added via SCIM. Users cannot be added manually, and may only access project/group resources via the UI by signing in through the SSO URL.
However, users will not be prompted to log via SSO on each visit. GitLab will check whether a user has authenticated through the SSO link, and will only prompt the user to login via SSO if it has been longer than 7 days.
We intend to add a similar SSO requirement for Git and API activity in the future.
NameID
GitLab.com uses the SAML NameID to identify users. The NameID element:
- Is a required field in the SAML response.
- Must be unique to each user.
- Must be a persistent value that will never change, such as a unique ID or username. Email could also be used as the NameID, but only if it can be guaranteed to never change.
Assertions
| Field | Supported keys |
|---|---|
| Email (required) |
email, mail
|
| Full Name | name |
| First Name |
first_name, firstname, firstName
|
| Last Name |
last_name, lastname, lastName
|
Metadata configuration
GitLab provides metadata XML that can be used to configure your Identity Provider.
- Navigate to the group and click Settings > SAML SSO.
- Copy the provided GitLab metadata URL
- Follow your Identity Provider's documentation and paste the metadata URL when it is requested.
Configuring GitLab
Once you've set up your identity provider to work with GitLab, you'll need to configure GitLab to use it for authentication:
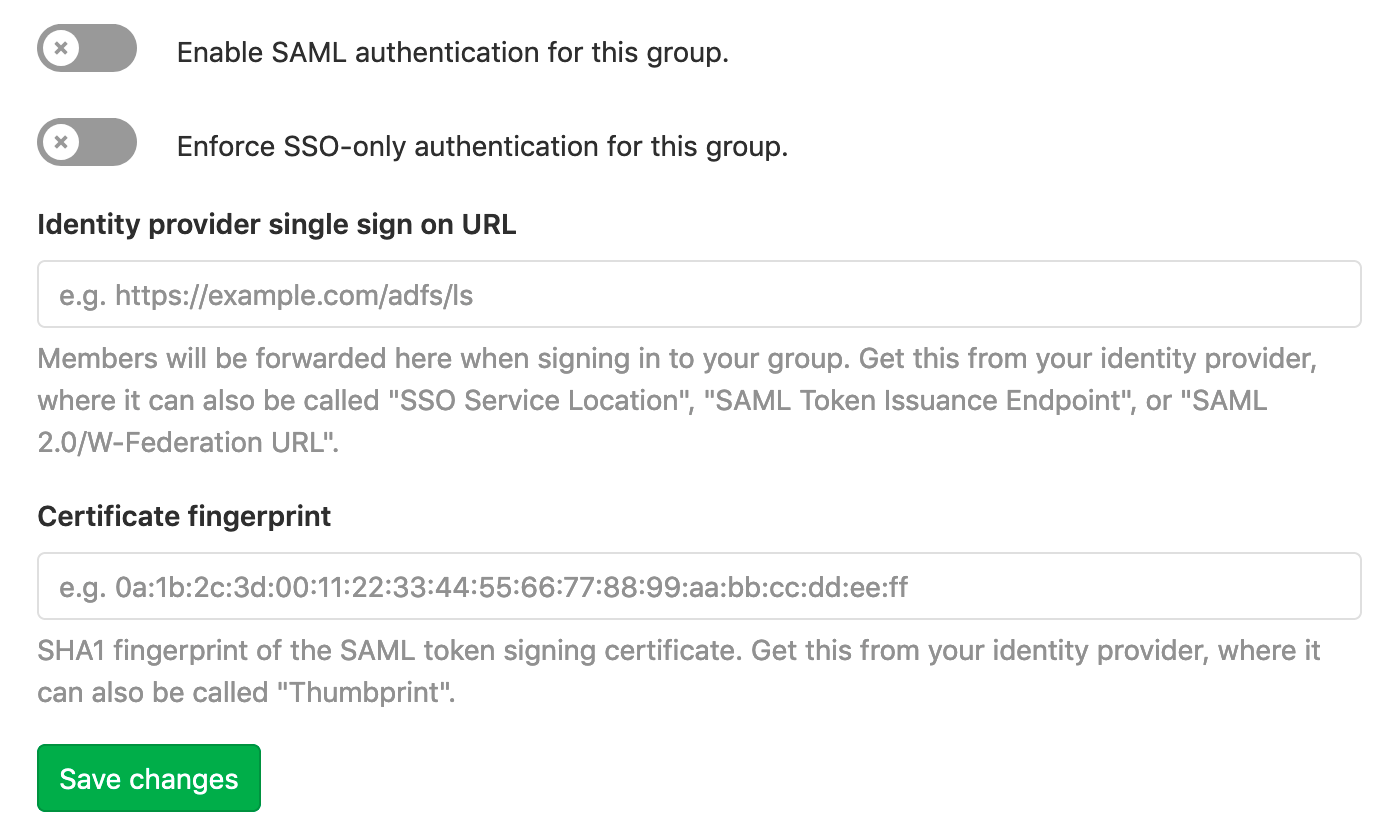
- Navigate to the group's Settings > SAML SSO.
- Find the SSO URL from your Identity Provider and enter it the Identity provider single sign on URL field.
- Find and enter the fingerprint for the SAML token signing certificate in the Certificate field.
- Click the Enable SAML authentication for this group toggle switch.
- Click the Save changes button.
Providers
| Provider | Documentation |
|---|---|
| ADFS (Active Directory Federation Services) | Create a Relying Party Trust |
| Azure | Configuring single sign-on to applications |
| Auth0 | Auth0 as Identity Provider |
| G Suite | Set up your own custom SAML application |
| JumpCloud | Single Sign On (SSO) with GitLab |
| Okta | Setting up a SAML application in Okta |
| OneLogin | Use the OneLogin SAML Test Connector |
| Ping Identity | Add and configure a new SAML application |
Linking SAML to your existing GitLab.com account
To link SAML to your existing GitLab.com account:
- Sign in to your GitLab.com account.
- Locate the SSO URL for the group you are signing in to. A group Admin can find this on the group's Settings > SAML SSO page.
- Visit the SSO URL and click Authorize.
- Enter your credentials on the Identity Provider if prompted.
- You will be redirected back to GitLab.com and should now have access to the group. In the future, you can use SAML to sign in to GitLab.com.
Signing in to GitLab.com with SAML
- Locate the SSO URL for the group you are signing in to. A group Admin can find this on a group's Settings > SAML SSO page. If configured, it might also be possible to sign in to GitLab starting from your Identity Provider.
- Visit the SSO URL and click the Sign in with Single Sign-On button.
- Enter your credentials on the Identity Provider if prompted.
- You will be signed in to GitLab.com and redirected to the group.
Unlinking accounts
Users can unlink SAML for a group from their profile page. This can be helpful if:
- You no longer want a group to be able to sign you in to GitLab.com.
- Your SAML NameID has changed and so GitLab can no longer find your user.
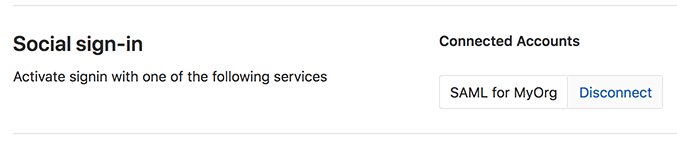
For example, to unlink the MyOrg account, the following Disconnect button will be available under Profile > Accounts:
Glossary
| Term | Description |
|---|---|
| Identity Provider | The service which manages your user identities such as ADFS, Okta, Onelogin or Ping Identity. |
| Service Provider | SAML considers GitLab to be a service provider. |
| Assertion | A piece of information about a user's identity, such as their name or role. Also know as claims or attributes. |
| SSO | Single Sign On. |
| Assertion consumer service URL | The callback on GitLab where users will be redirected after successfully authenticating with the identity provider. |
| Issuer | How GitLab identifies itself to the identity provider. Also known as a "Relying party trust identifier". |
| Certificate fingerprint | Used to confirm that communications over SAML are secure by checking that the server is signing communications with the correct certificate. Also known as a certificate thumbprint. |