Introduction to CI/CD with GitLab
In this document we'll present an overview of the concepts of Continuous Integration, Continuous Delivery, and Continuous Deployment, as well as an introduction to GitLab CI/CD.
NOTE: Out-of-the-box management systems can decrease hours spent on maintaining toolchains by 10% or more. Watch our "Mastering continuous software development" webcast to learn about continuous methods and how GitLab’s built-in CI can help you simplify and scale software development.
Introduction to CI/CD methodologies
The continuous methodologies of software development are based on automating the execution of scripts to minimize the chance of introducing errors while developing applications. They require less human intervention or even no intervention at all, from the development of new code until its deployment.
It involves continuously building, testing, and deploying code changes at every small iteration, reducing the chance of developing new code based on bugged or failed previous versions.
There are three main approaches to this methodology, each of them to be applied according to what best suits your strategy.
Continuous Integration
Consider an application which has its code stored in a Git repository in GitLab. Developers push code changes every day, multiple times a day. For every push to the repository, you can create a set of scripts to build and test your application automatically, decreasing the chance of introducing errors to your app.
This practice is known as Continuous Integration; for every change submitted to an application - even to development branches - it's built and tested automatically and continuously, ensuring the introduced changes pass all tests, guidelines, and code compliance standards you established for your app.
GitLab itself is an example of using Continuous Integration as a software development method. For every push to the project, there's a set of scripts the code is checked against.
Continuous Delivery
Continuous Delivery is a step beyond Continuous Integration. Your application is not only built and tested at every code change pushed to the codebase, but, as an additional step, it's also deployed continuously, though the deployments are triggered manually.
This method ensures the code is checked automatically but requires human intervention to manually and strategically trigger the deployment of the changes.
Continuous Deployment
Continuous Deployment is also a further step beyond Continuous Integration, similar to Continuous Delivery. The difference is that instead of deploying your application manually, you set it to be deployed automatically. It does not require human intervention at all to have your application deployed.
Introduction to GitLab CI/CD
GitLab CI/CD is a powerful tool built into GitLab that allows you to apply all the continuous methods (Continuous Integration, Delivery, and Deployment) to your software with no third-party application or integration needed.
How GitLab CI/CD works
To use GitLab CI/CD, all you need is an application codebase hosted in a
Git repository, and for your build, test, and deployment
scripts to be specified in a file called .gitlab-ci.yml,
located in the root path of your repository.
In this file, you can define the scripts you want to run, define include and cache dependencies, choose commands you want to run in sequence and those you want to run in parallel, define where you want to deploy your app, and specify whether you will want to run the scripts automatically or trigger any of them manually. Once you're familiar with GitLab CI/CD you can add more advanced steps into the configuration file.
To add scripts to that file, you'll need to organize them in a sequence that suits your application and are in accordance with the tests you wish to perform. To visualize the process, imagine that all the scripts you add to the configuration file are the same as the commands you run on a terminal in your computer.
Once you've added your .gitlab-ci.yml configuration file to your
repository, GitLab will detect it and run your scripts with the
tool called GitLab Runner, which
works similarly to your terminal.
The scripts are grouped into jobs, and together they compose
a pipeline. A minimalist example of .gitlab-ci.yml file
could contain:
before_script:
  - apt-get install rubygems ruby-dev -y

run-test:
  script:
    - ruby --version
The before_script attribute would install the dependencies
for your app before running anything, and a job called
run-test would print the Ruby version of the current system.
Both of them compose a pipeline triggered at every push
to any branch of the repository.
GitLab CI/CD not only executes the jobs you've set, but also shows you what's happening during execution, as you would see in your terminal:
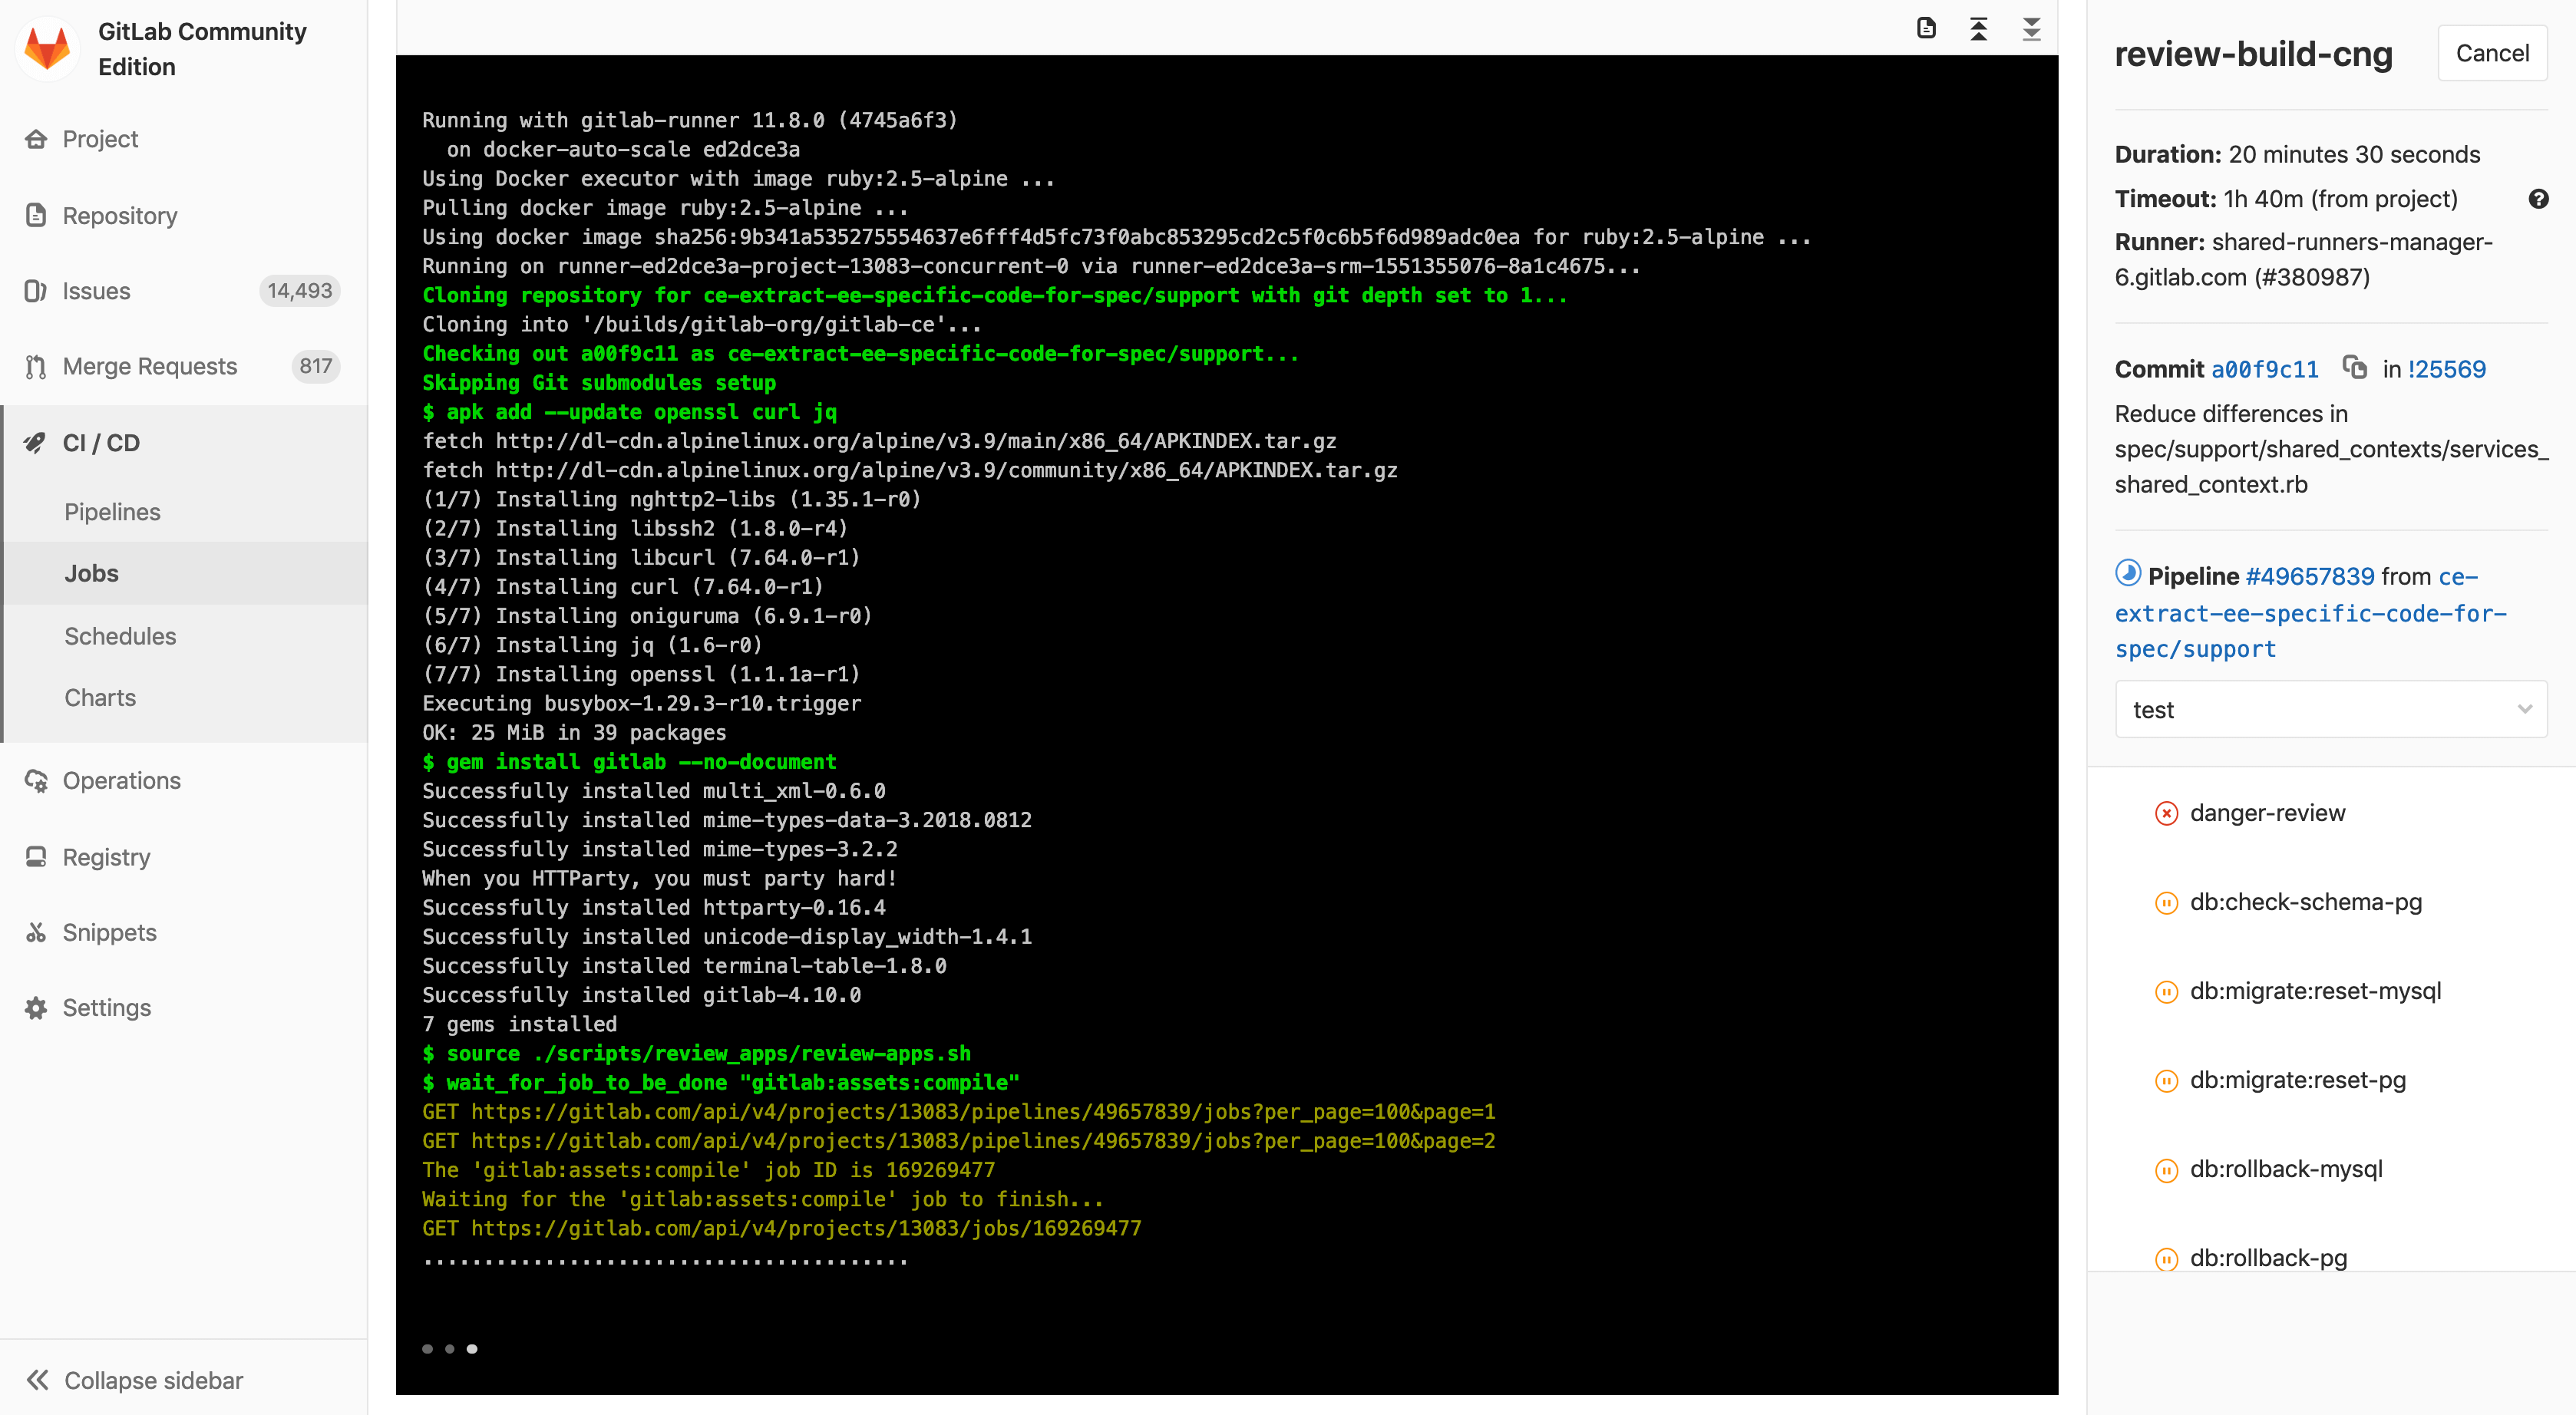
You create the strategy for your app and GitLab runs the pipeline for you according to what you've defined. Your pipeline status is also displayed by GitLab:

At the end, if anything goes wrong, you can easily roll back all the changes:

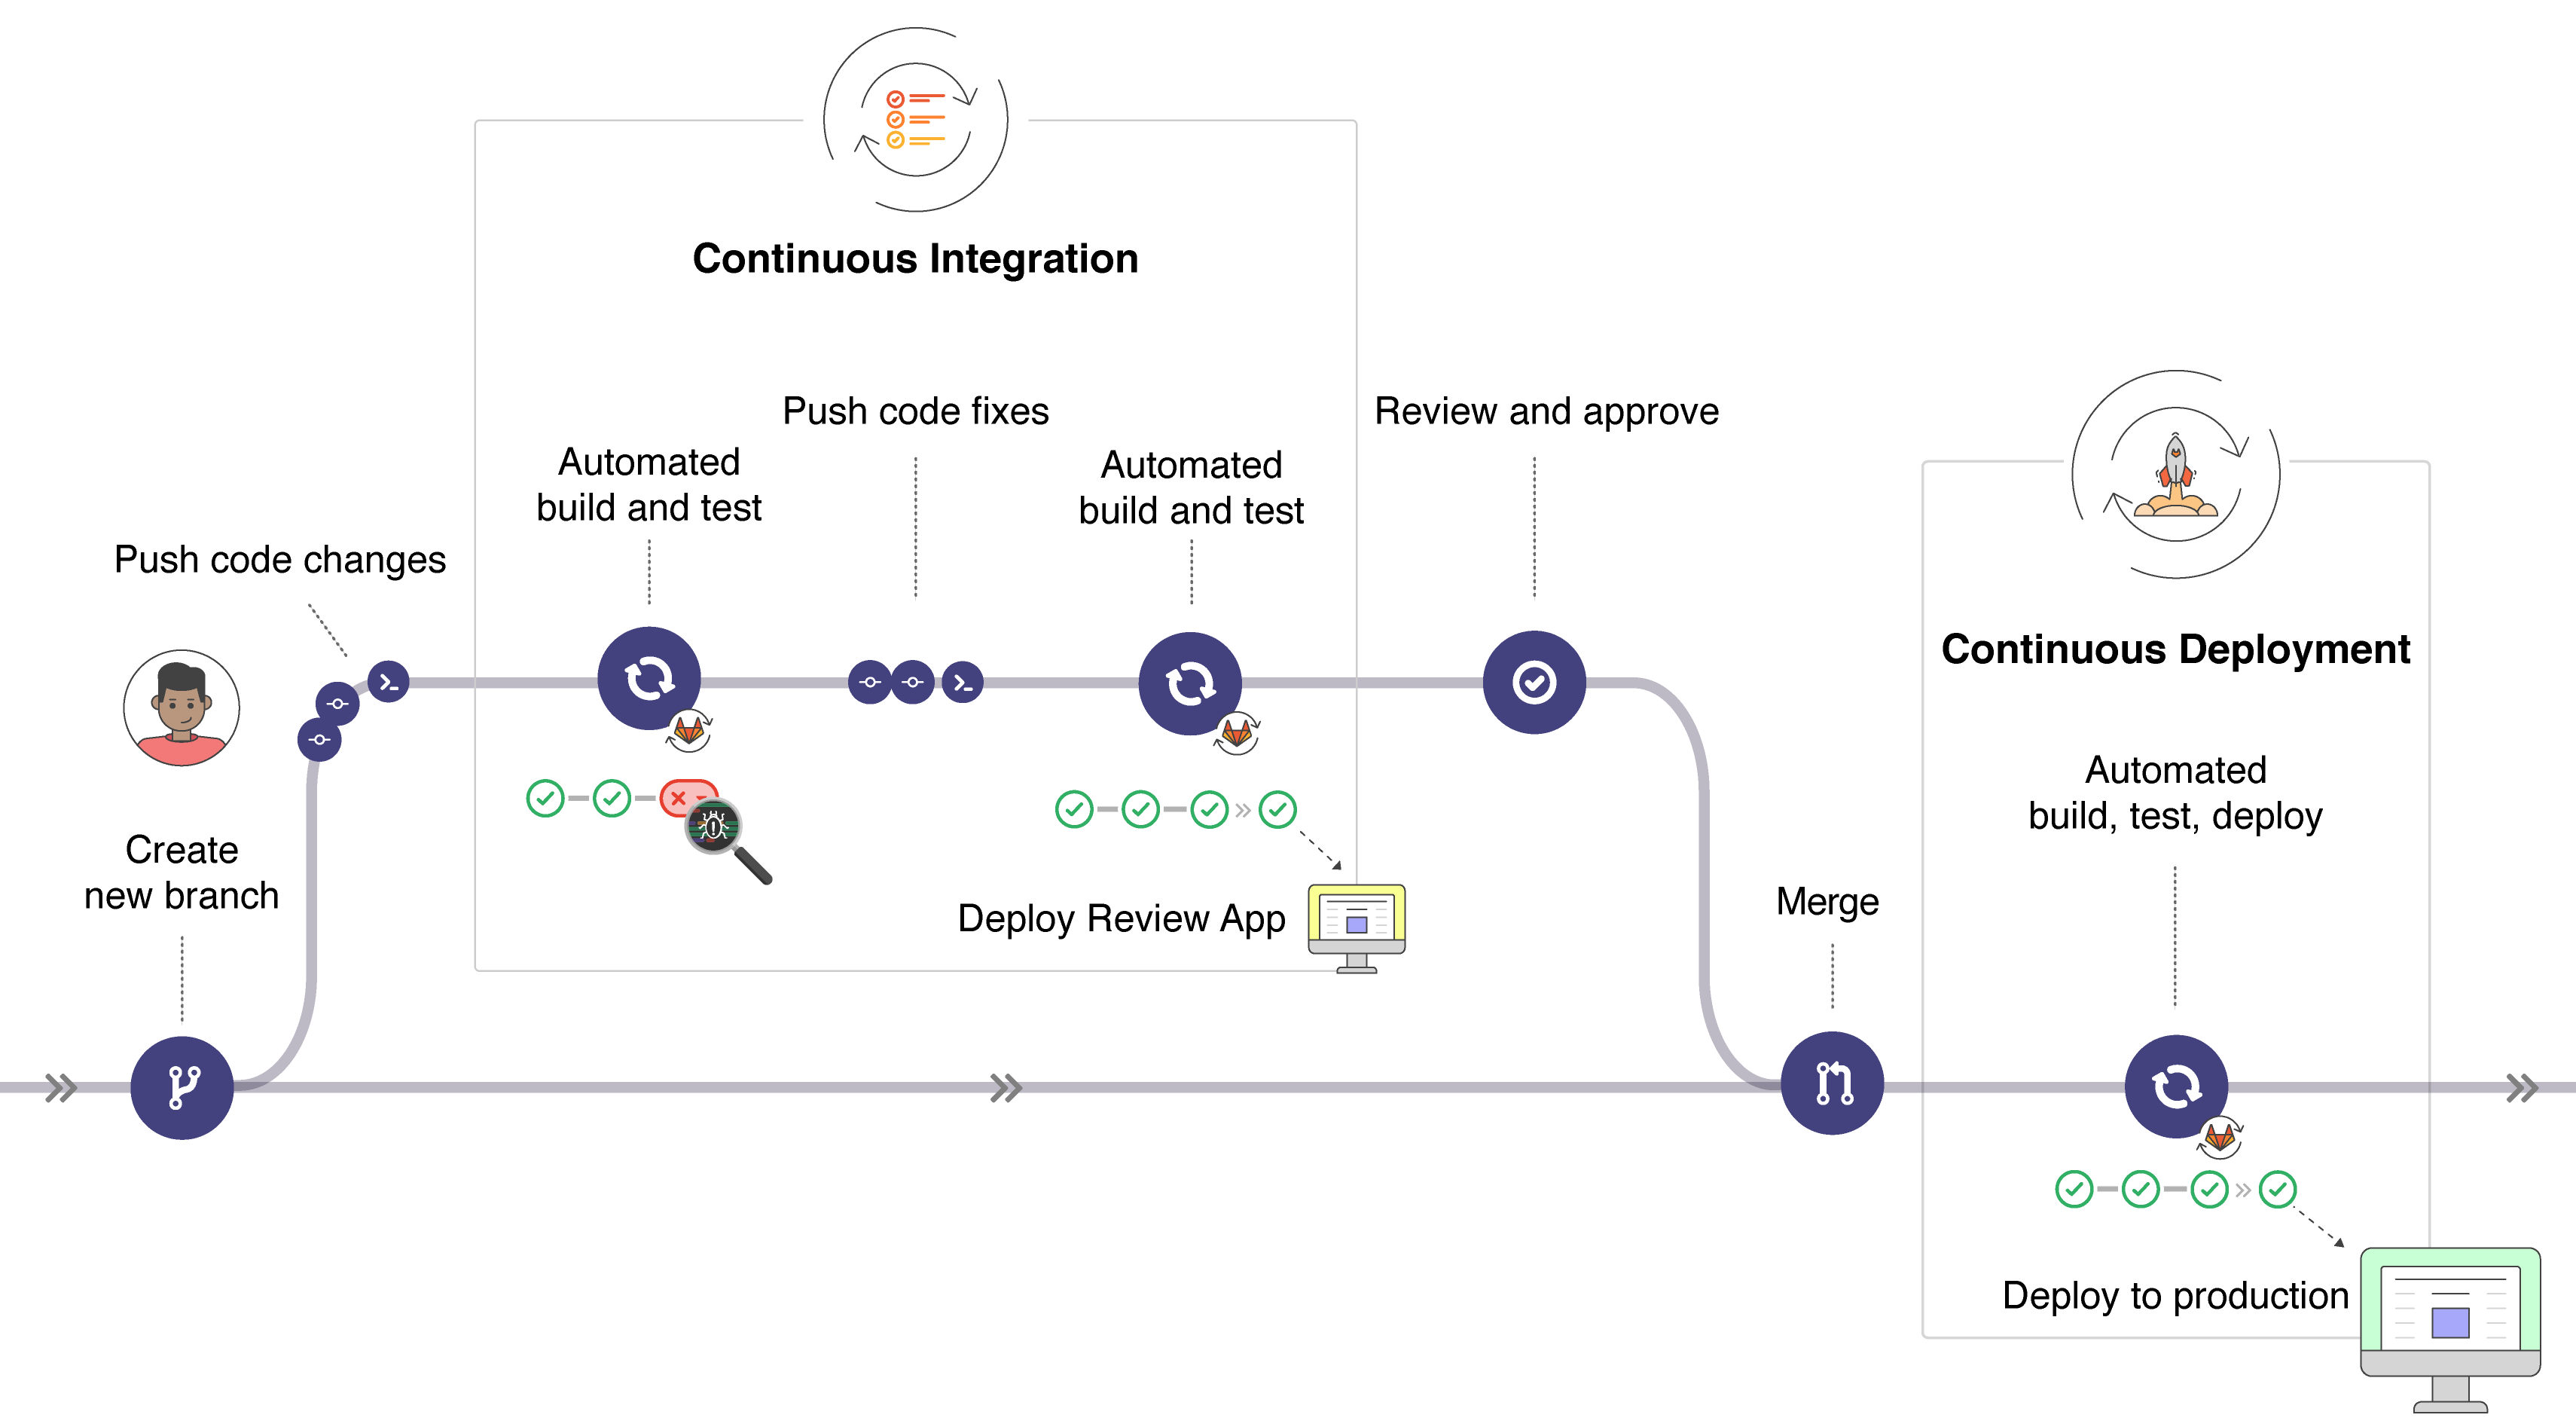
Basic CI/CD workflow
Consider the following example for how GitLab CI/CD fits in a common development workflow.
Assume that you have discussed a code implementation in an issue and worked locally on your proposed changes. Once you push your commits to a feature branch in a remote repository in GitLab, the CI/CD pipeline set for your project is triggered. By doing so, GitLab CI/CD:
- Runs automated scripts (sequential or parallel) to:
- Build and test your app.
- Preview the changes per merge request with Review Apps, as you
would see in your
localhost.
Once you're happy with your implementation:
- Get your code reviewed and approved.
- Merge the feature branch into the default branch.
- GitLab CI/CD deploys your changes automatically to a production environment.
- And finally, you and your team can easily roll it back if something goes wrong.
GitLab CI/CD is capable of doing a lot more, but this workflow exemplifies GitLab's ability to track the entire process, without the need of any external tool to deliver your software. And, most usefully, you can visualize all the steps through the GitLab UI.
A deeper look into the CI/CD basic workflow
If we take a deeper look into the basic workflow, we can see the features available in GitLab at each stage of the DevOps lifecycle, as shown on the illustration below.
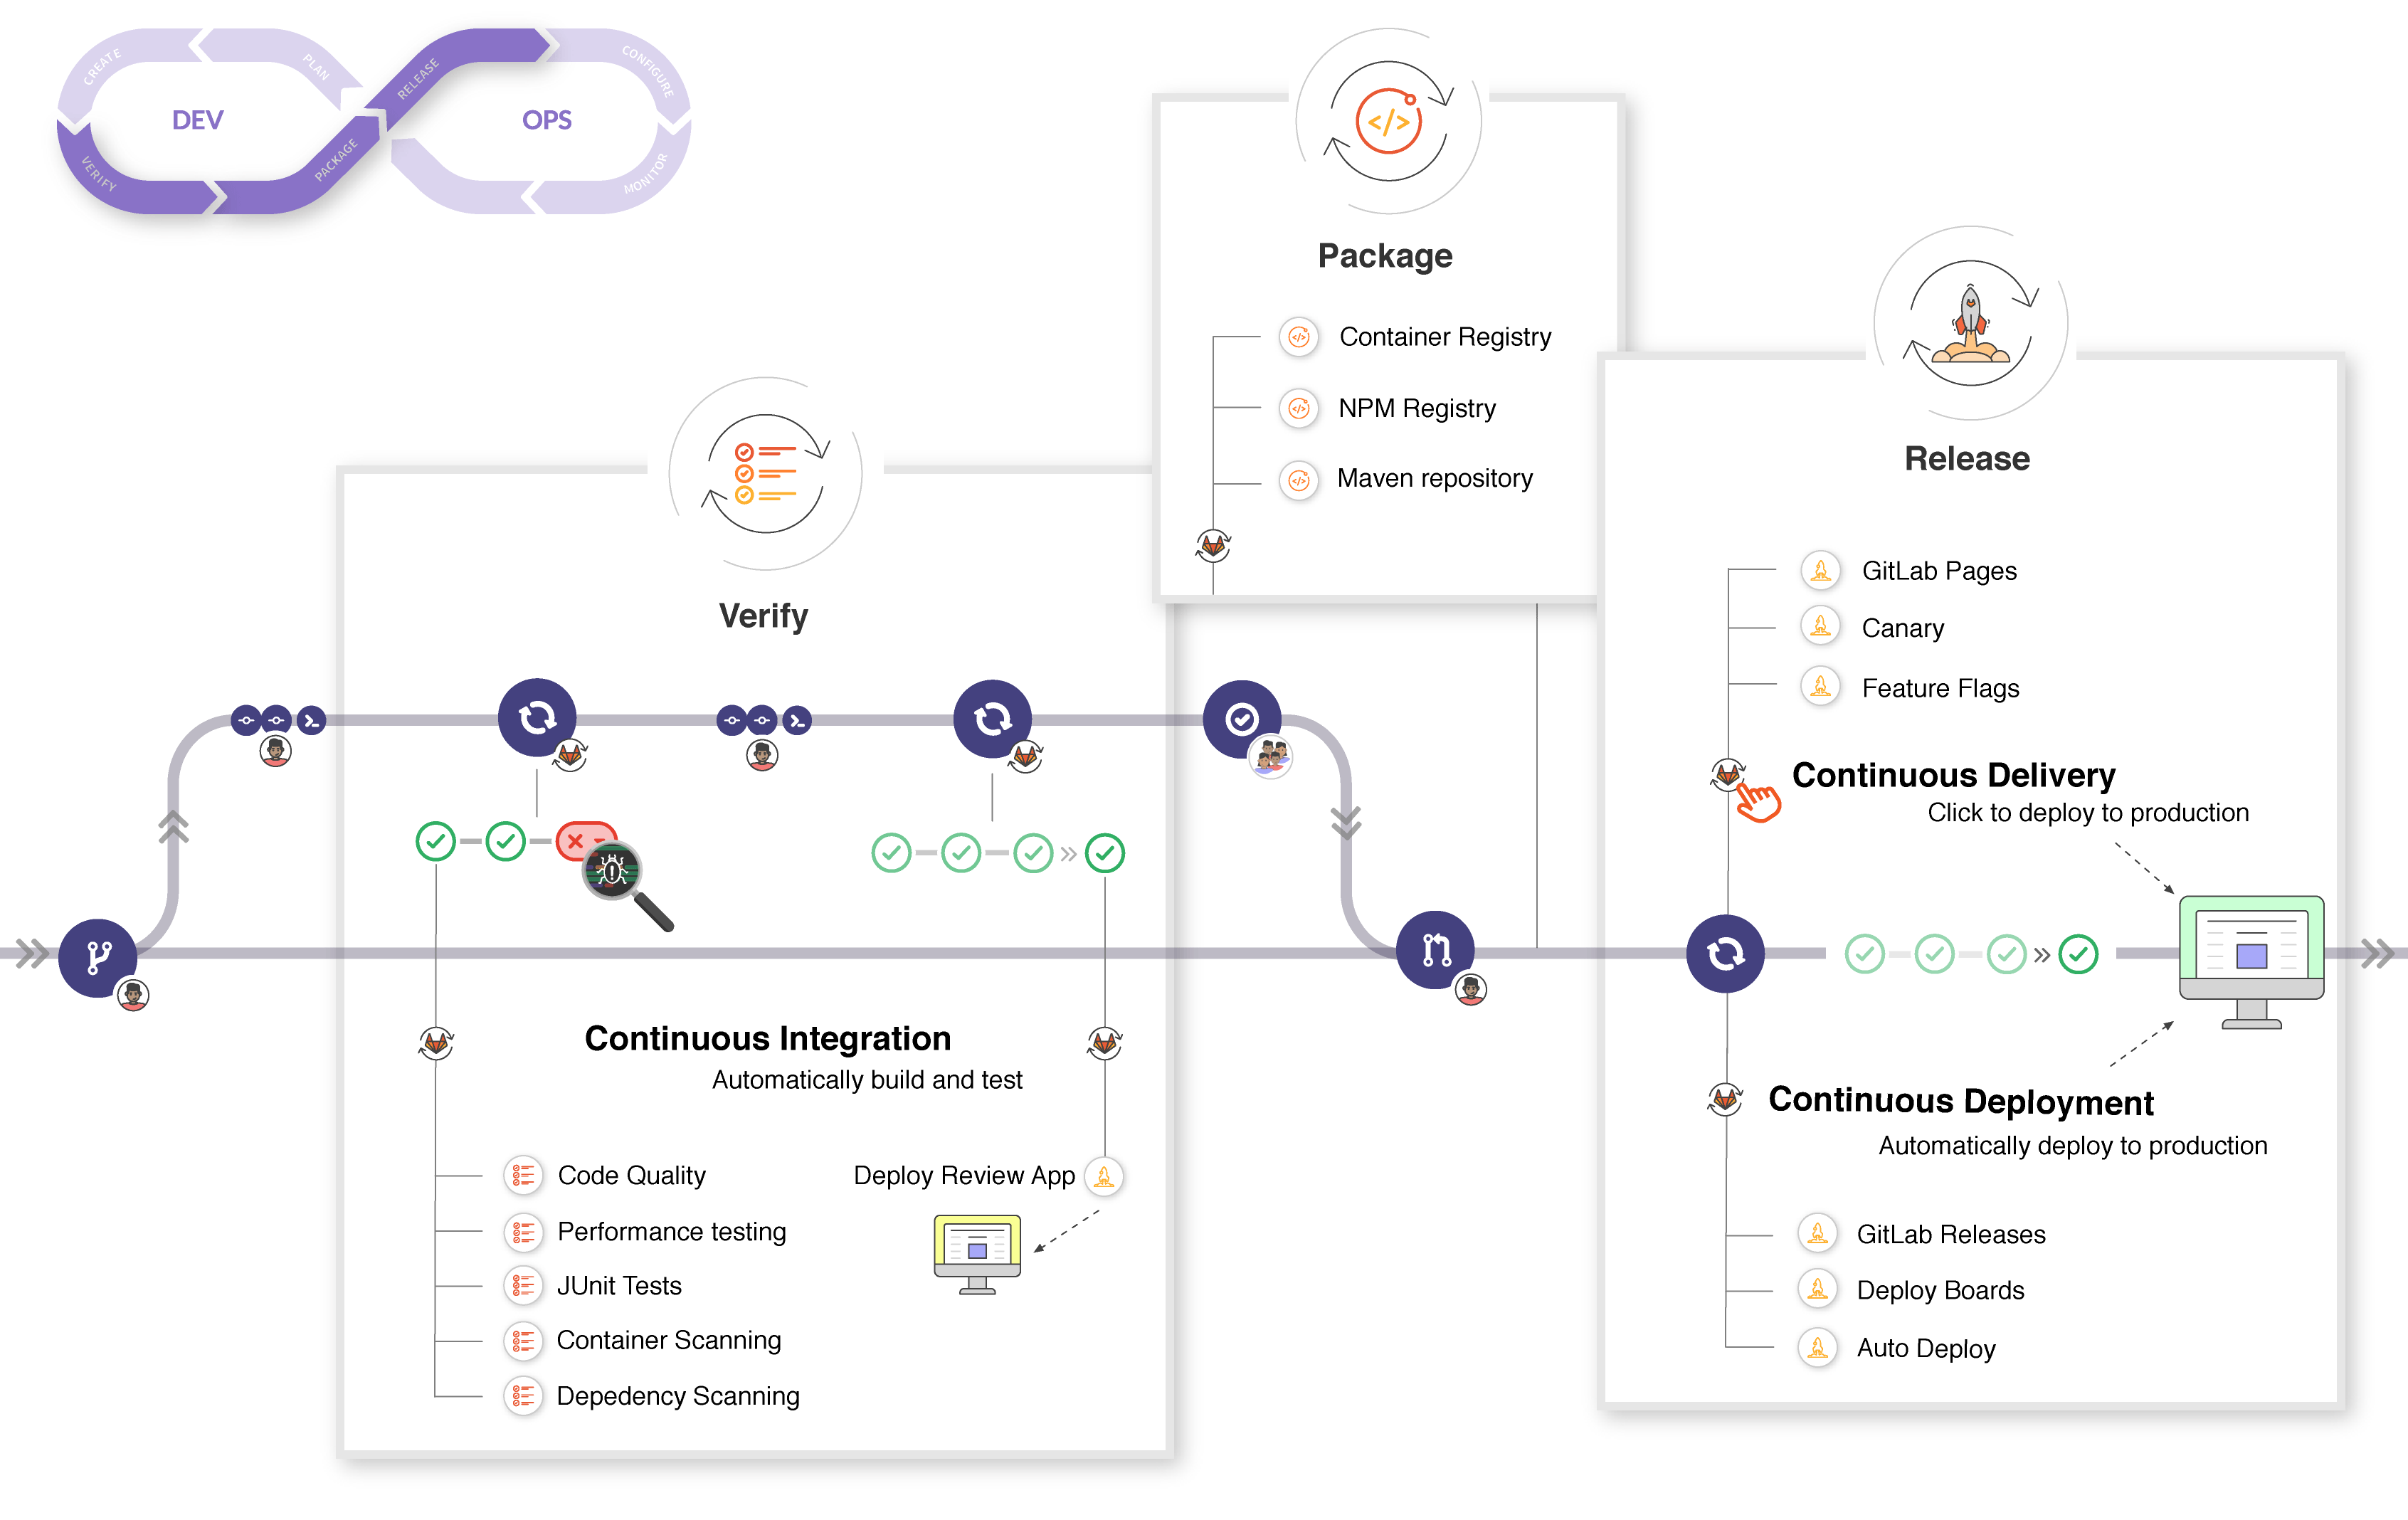
If you look at the image from the left to the right, you'll see some of the features available in GitLab according to each stage (Verify, Package, Release).
-
Verify:
- Automatically build and test your application with Continuous Integration.
- Analyze your source code quality with GitLab Code Quality. (STARTER)
- Determine the performance impact of code changes with Browser Performance Testing. (PREMIUM)
- Perform a series of tests, such as Container Scanning (ULTIMATE), Dependency Scanning (ULTIMATE), and JUnit tests.
- Deploy your changes with Review Apps to preview the app changes on every branch.
-
Package:
- Store Docker images with Container Registry.
- Store NPM packages with NPM Registry. (PREMIUM)
- Store Maven artifacts with Maven Repository. (PREMIUM)
-
Release:
- Continuous Deployment, automatically deploying your app to production.
- Continuous Delivery, manually click to deploy your app to production.
- Deploy static websites with GitLab Pages.
- Ship features to only a portion of your pods and let a percentage of your user base to visit the temporarily deployed feature with Canary Deployments. (PREMIUM)
- Deploy your features behind Feature Flags. (PREMIUM)
- Add release notes to any Git tag with GitLab Releases.
- View of the current health and status of each CI environment running on Kubernetes with Deploy Boards. (PREMIUM)
- Deploy your application to a production environment in a Kubernetes cluster with Auto Deploy.
With GitLab CI/CD you can also:
- Easily set up your app's entire lifecycle with Auto DevOps.
- Deploy your app to different environments.
- Install your own GitLab Runner.
- Schedule pipelines.
- Check for app vulnerabilities with Security Test reports. (ULTIMATE)
To see all CI/CD features, navigate back to the CI/CD index.
Watch the video GitLab CI Live Demo with a deeper overview of GitLab CI/CD.
Setting up GitLab CI/CD for the first time
To get started with GitLab CI/CD, you need to familiarize yourself
with the .gitlab-ci.yml configuration file
syntax and with its attributes.
This document introduces the concepts of GitLab CI/CD in the scope of GitLab Pages, for deploying static websites. Although it's meant for users who want to write their own Pages script from scratch, it also serves as an introduction to the setup process for GitLab CI/CD. It covers the very first general steps of writing a CI/CD configuration file, so we recommend you read through it to understand GitLab's CI/CD logic, and learn how to write your own script (or tweak an existing one) for any application.
For a deep view of GitLab's CI/CD configuration options, check the
.gitlab-ci.yml full reference.